March 28, 2011

The $12 Dresser

A while back, we stumbled across a dresser at Goodwill that we thought would be great for extra storage in our small office. I wasn't too fond of it's uniqueness ugliness, so I probably would have just walked right on by and not given it another glance. Except, I happened to catch a glimpse of its $12 price tag. I'll have to admit, I was pretttty excited! $12 for a dresser made of good, solid wood? Yes, please :) So here's what the poor thing looked like on the day we stumbled across it...it was definitely NOT giving me that whole "love at first sight" feeling...

Alas, I could not pass up the $12. Even if I couldn't fix it's horrible ugliness, it wouldn't be that big of a deal because I spent a whole...$12. So here it is once we got it to my parent's house on the bay -- sanding/priming/painting this thing at our apartment complex wouldn't have been such an easy task.

It definitely needed some wood putty, among many other things...


To top off the sweet price tag, look what I found in the drawers. Nails, a battery, a photo negative strip, and 52 cents (which brings my total down to $11.48, by the way). Pretty cool, huh?


The first step to giving this dresser some love was to sand it down. Here's a photo of Caleb working hard...don't have many photos like this one. Jot this down, Caleb is working! Haha, I kid.

Sanding seemed like the most time-consuming part of this entire project. It definitely needed to be smoothed out before priming and painting. More sanding...

And even more sanding...

Much better with the wood putty...

Sidenote: It's hard to complain about all of this hard work when the scenery looks like this. Thanks, mom and dad for supplying us with such a wonderful workspace on your back deck!

In progress, with one coat of primer.

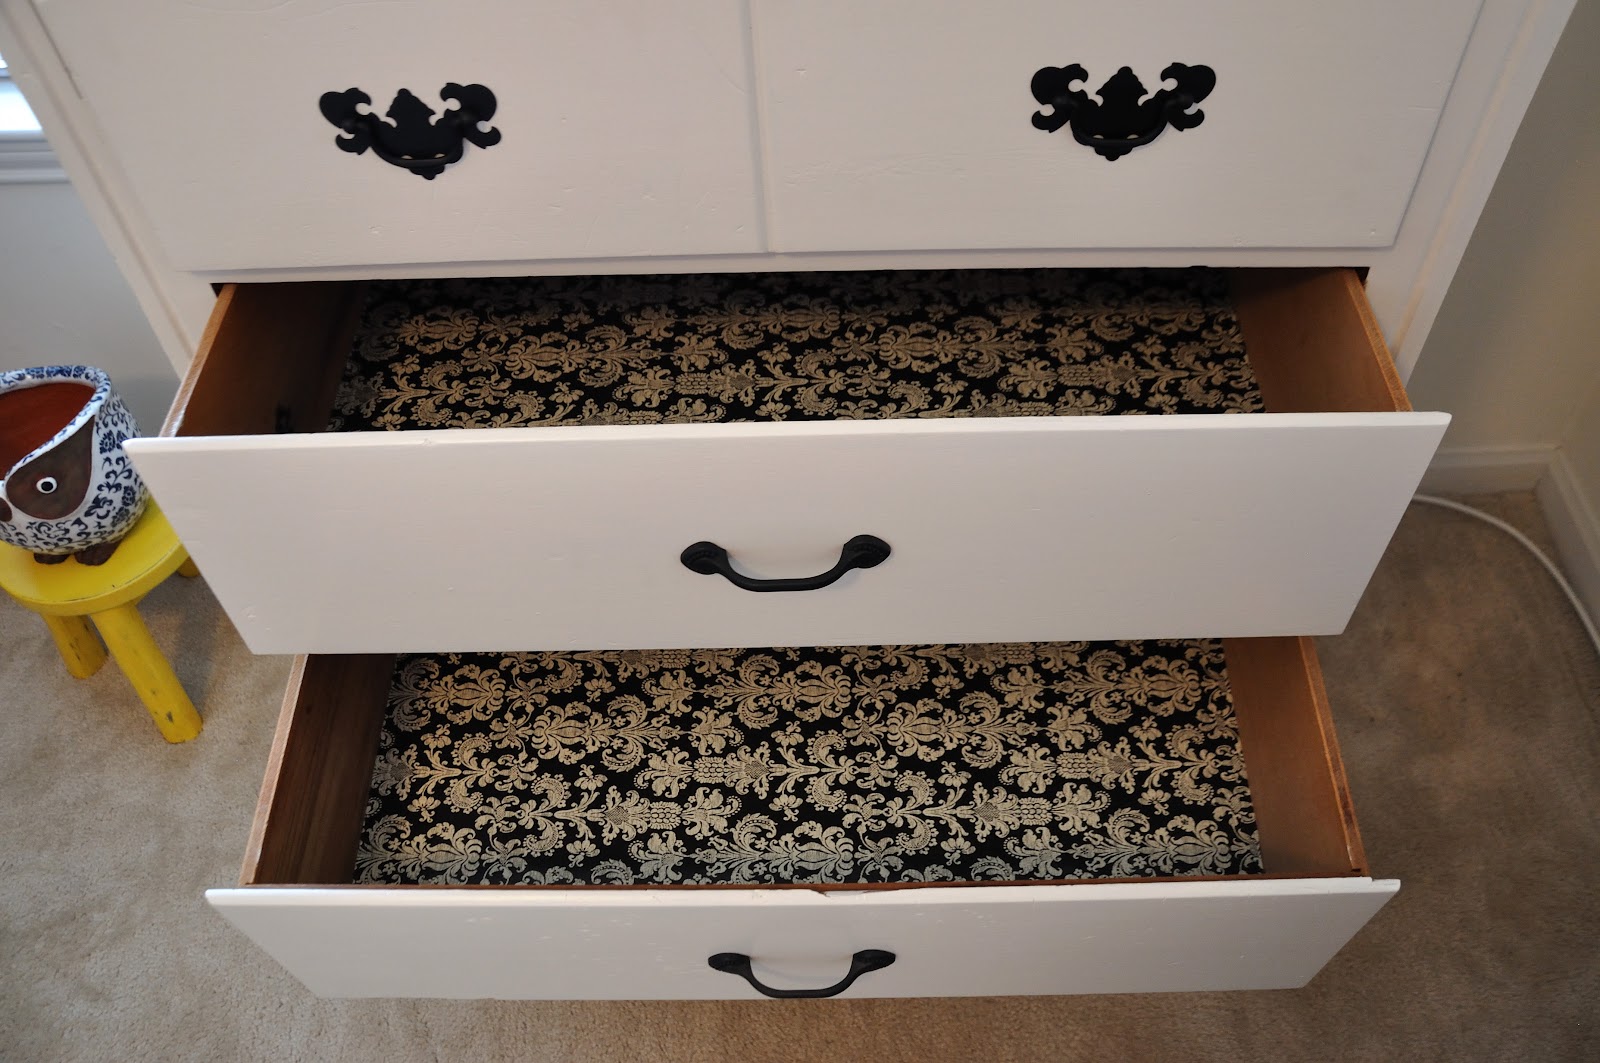
Before I reveal the "after," here are some details on some other things we did to fix up this little guy. First of all, the paint color is Glidden's Antique White -- a great creamy white. We also wanted to replace the ugly, bronze handles/pulls with something more updated. I spray painted two of the original bronze handles black, and that alone made a huge difference.

I also wanted to add different hardware to the bottom three drawers. That's when I spotted these pulls at Home Depot for $3.96 each. I have to admit, I did bring home about 5 other pulls as well. I like to bring home a variety and then decide which ones I want to use. Then return the others!

And now, for my favorite part of the makeover...

I found this wrapping paper at Target that I think looks fabulous with the dresser. Surprisingly, one roll fit all four drawers perfectly! The scroll pattern in the wrapping paper matches the scroll design of the original handles. I just used double-sided tape to line the drawers. That way I can easily change it out if I ever decide to switch it up a bit.

And here's a full view of the updated dresser that we did on a fabulous, thrifty budget! I just love it, and I think it's so cute for a $12 dresser. Plus, it's so functional with all of the extra storage space. No, it's not perfect, but we are still very proud parents :)


Here's a breakdown of what we spent out of pocket:

Dresser: $12
Primer: FREE (used a Home Depot gift card)
1 Quart of Paint: $5.24
Handles: $11.88
Wrapping paper: $3.49
_______________
$32.61

So there's a (long) summary of our couple-of-weekends dresser project. Can't wait to post about my other recent thrifty find :)

February 15, 2011

Be Mine (Times Seven)

Our 7th Valentine's Day was wonderful! It is so nice to go out to dinner (at Texas Roadhouse. Yum.) and spend quality time with the hubby. It's also nice to come home from work with a beautiful bouquet of flowers on the table...


...and a single rose in the bedroom...


...and a bed that has been made (which never happens since we leave for work early in the a.m.). It's also nice to have the hubby bring home a dozen chocolate covered strawberries from Three George's. :)

Oh, and if you're thinking Caleb got the short end of the deal...Don't. He got a lovely bottle of his favorite wine from his favorite valentine.


But enough of that gushy stuff. Whether you spent the holiday with your family/spouse/significant other/best friend/pet -- I hope your Valentine's was a day to remember.

February 7, 2011

How Cool is This?!

For the past two weeks I have been going to a wire-wrapped glass jewelry class. And let me tell you...it has been quite interesting and a whole lot of fun! The classes are sponsored by Space 301 in downtown Mobile. When the hubby and his family signed me up as a Christmas gift, I thought it was going to be somewhat simple. Was I wrong. It's way more complicated than what I imagined, but I've learned so much!

Here are the slabs of glass that I started with...


We each got to pick what color combinations, etc. There were so many glass slabs, which made it really hard to decide what to choose. Plus, the glass doesn't even look the same once you put it in the kiln, so it's hard to know ahead of time what will look decent. Scary.

Anyway, we learned to cut them in a special glass-cutting session...(P.S. I'm pretty proud of myself for leaving the place with only one BandAid...SUCCESS!

...and this is what mine looked like after the cutting...

...and here is what they looked like after class #2...
I only had time to wrap two of them, but I will be finishing the polka dotted one up this week.

In order to nudge the wire wrapping around the glass, we cut a slit around the edge. I wrapped this yellow piece (that looks like candy, yum) and the multicolored piece in sterling silver AND copper. I'm planning to wrap the polka dotted piece in all silver.

Lemondrop, anyone?...


So there you have it! And in case you're wondering what those lovely pieces of jewelry are resting on...I will fill you in. IT'S MY NEW OTTOMAN that I told you about here.

Cute, huh? And it fits perfectly in that little spot in our entryway. Couldn't ask for more.


January 25, 2011

Ottomans, Ottomans, Everywhere.

So, I have this new thing for storage ottomans. I bought this one a few weeks ago, and it has changed my life for the better (seriously!). It now holds all of our throw pillows that are not currently on duty in the living room. FYI, I like to rotate my pillows so nobody ever feels left out.
Where were they before I bought this swanky, go-with-everything ottoman? On the floor. In the middle of everything. In my way. In the hubby's way. (Like how I over explained that for you?)

Even better? Target is having it's new year home event right now, and guess what I found? Another storage ottoman that I almost bought a while back. Now, with it's new price tag of $59.99 thanks to the Target sale, I think it would look fabulous in our bedroom :) We shall see.

January 13, 2011

Mini Makeover: The Laundry Room Phase One

Eeeeeee! We love mini makeovers here. Seriously, it's such a great feeling. Here's the drab "before" shot of our itsy bitsy teenie weenie (not so polka dotted) laundry room. Yawn.
See all the cleaning/laundry supplies on top? Yeah, that wasn't working for me AT ALL.
And here's the laundry room just a few minutes later. Squeaky clean and clutter-free.
Once again, I've grouped like with like. The white crate that was once in the give away pile soon found it's new purpose in life. To house our laundry supplies -- detergent, dryer sheets, stain remover, fabric softener, and linen spray -- all in one spot. 
An added bonus to the crate-turned-laundry-storage idea is that it provides us with an extra "shelf" that we are now using to store extra paper towel rolls.
Much better, no? 

January 11, 2011

Don't mess with my mess.

In my opinion, it is somewhat  a challenge to keep a small apartment clutter-free. With 2010 long gone, I have had the urge to get rid of things. You know, live the "simple" life. I've always loved having a place for everything and having everything in it's place. That's why when 2011 rolled around, I began The Purge.

Maybe it's my obsessive compulsive-ness (is that a word?) or maybe it's the fact that I sleep easier when my living space is as clutter-free as possible. Who knows. Either way, I think it's a great little quirk to have...especially if it keeps your house looking its best.

I thought I'd share my favorite tips for paring down your goods.

Focus on one room at a time. Start with the room that needs the most work, and focus on one area of that room. Once you are finished with that area, move on to the next. I like to work clockwise so it's a lot less likely that I will become overwhelmed with "stuff."

Divide items into three piles: Give Away, Toss, and Keep.

Ask yourself if you love the item, need the item, or use the item. If you answer "no" to an item, it doesn't belong in your house, silly!

Take it slow. No need to de-clutter into the night. Don't overwhelm yourself, and take breaks. I'm sure your mess won't mind.

We are still in the process of paring down Casa Givens. Keep reading for updates (and more photos) of our Purge. For now, here is a little something to ease your mind and give you a little organizing boost...

Our living room bookcase "after."


I apologize for no "before" photo, but I'm sure you can imagine. Our book/magazine stash had slowly migrated from the office onto this bookshelf, and I'm so glad I took care of that. As you can see, I really like to organize by type. The mustangs with the mustangs, etc. This project took all of 5 minutes. Just some purging and rearranging. See how easy that was?

Merr-Wii Christmas to Me!

Christmas has come and gone, but I had to share. Check out one of my Christmas gifts from the hubby. He's the best...and so clever too!